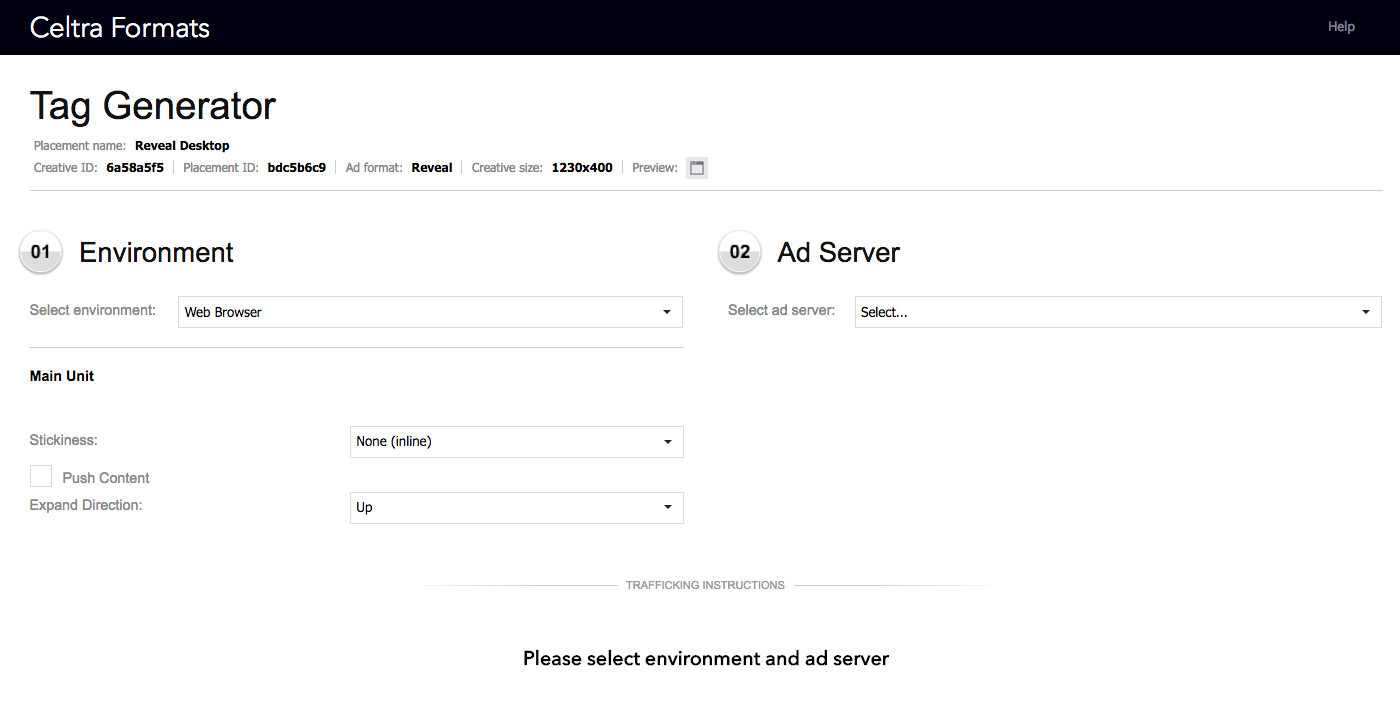
The Tag Generator is an essential step toward selecting the right set of tags for a creative to run in various types of media properties. Each publisher, ad network or SSP has a different logic of rich media ad serving and rendering, especially in applications. The tag generator supports a safe creation of accurate tags per media partner. In order to generate tags, you first need to have a placement with a creative assigned to it.
Updated: December 24th, 2025
To generate tags for a creative in the Tag Generator window:
Select an SDK . For running in mobile web – select mobile web. For in-application inventory you need to know what SDK is used by the media property.
Generate separate tags for in-app and mobile web inventory.
Select an ad server to use.
A unique tag is generated automatically.
You can specify additional settings and display options depending on the combination of SDK and Ad Server you choose.
From here you can copy the tag or send it for trafficking in the ad server.
Desktop Expandable Banners
The destination of an ad is often not known at the time it is built. To accommodate this, the trafficker must specify the expand direction of the ad, based on where it will be located on the page.
The Centered on screen option fills the entire area on the screen, with the creative unit placed in the center. For best results with this option, use Overflow to eliminate whitespace around the creative.
Sticky Banner Options
You can configure the location of a sticky banner and enable or disable the close button in creatives that use the Mobile Web SDK.
Formats that support stickiness:
Rich Media
Universal Banner
Universal Expandable
Universal Reveal
Banner
Expandable Banner
Reveal
Fast-Loading Banner
Fast-Loading Expandable
Apple News
Standard Banner
Standard Expandable Banner
Double Banner
Double Expandable Banner
Large Banner
Large Expandable Banner
MREC Banner
MREC Expandable Banner
IAB 320x50 Banner
IAB 320x50 Expandable Banner
IAB 300x250 Banner
IAB 300x250 Expandable Banner
IAB 320x320 Banner
IAB 320x320 Expandable Banner
IAB 300x600 Banner
IAB 300x600 Expandable Banner
IAB 728x90 Banner
IAB 728x90 Expandable Banner
IAB 970x250 Banner
IAB 970x250 Expandable Banner
Interstitial Banner
Selecting VAST version
For Universal VAST videos, you may select the preferred VAST version from the Vast Unit section dropdown menu.
Exposed Events
In the Event Tracking section, you can supply your own tracking pixels to events that have been exposed.
Standard events are exposed by default, but custom events can only be exposed by someone responsible for trafficking the campaign.
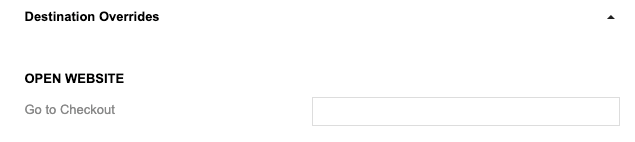
Destination Overrides
In the Destination Overrides section, you can supply your own destination URLs to override the destinations set in the Builder.
Destination overrides are available only for Open Website and Get App actions.
Click
Select the Use as Destination option if the ad server click macro contains a landing page redirect. Enabling Click as the destination assumes the ad server provides the URL.
Always use HTTPS on iOS
When you select an in-app SDK, you can select to use HTTPS for all impressions served to iOS devices. This option is enabled by default. If you have further questions about this setting, please contact support@celtra.com.
Anonymize IP Addresses
Selecting this options anonymizes all user IP addresses as they're reported to Celtra.
Setup Macros for Advertising IDs
Pre-configured tag generator entries will have these macros included if they are available.
To set up macros for advertising IDs, do the following:
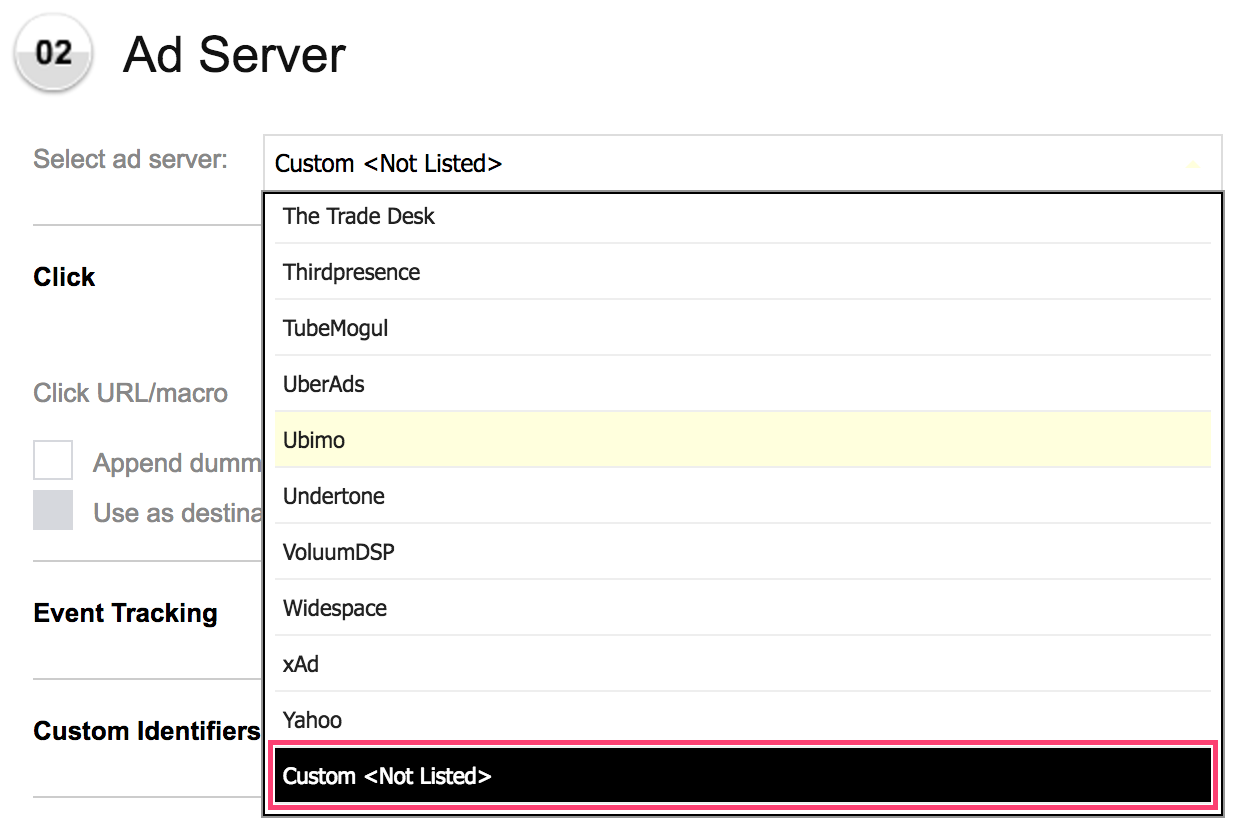
In the Tag Generator, go to the select ad server dropdown.
Scroll to the bottom and select Custom .
Under Advertising Identifiers, enter an identifier for each OS.
Select either tracking limited or unlimited for the macro.
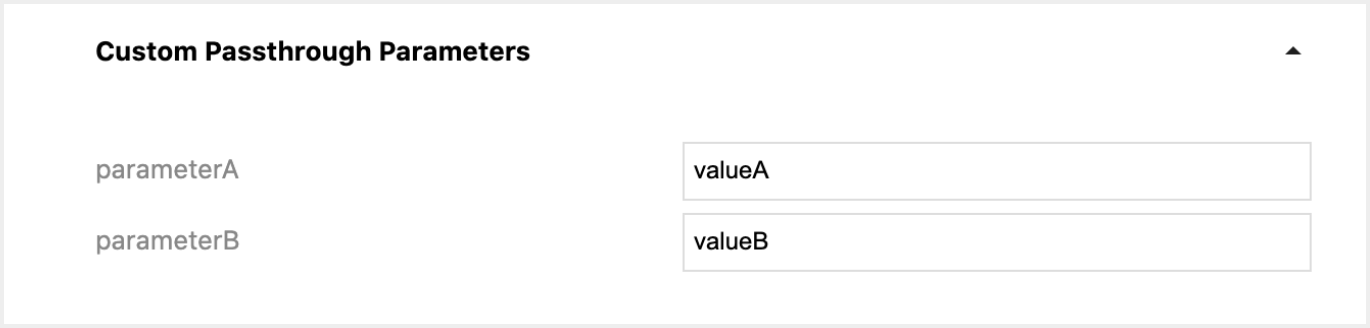
Custom Passthrough Parameters
Edit custom passthrough parameters in Tag Generator. At least 1 custom passthrough parameter needs to be defined in the General Account Settings, to enable this editing option. Edited values in the Tag Generator will be automatically updated in the generated tag. If you delete the value, it will automatically be removed from the generated tag. For more info, visit Custom Passthrough Parameters.
Setup Macros for GPS
You can apply GPS macros to any tag configuration where they are not included by default. You can verify this by checking if the GPS panel is exposed in the Tag Generator.
To set up macros for GPS, do the following:
In the Tag Generator, go to the select ad server dropdown.
Under GPS, enter a latitude and longitude macro from the ad server you’re using.
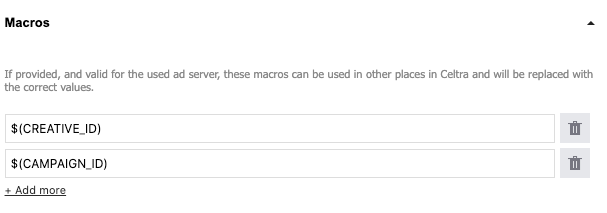
Setup External Ad Server Macros
You can place ad server-specific values if you need to use the external ad server macros. For example, this may be in the cases of external tracking specifically created for a specific ad server or other supported places.
Each added macro results in a new line of code in the created tag and enables Celtra to map the value provided by the ad server to this specific macro.
In Celtra, the most used external ad server macro values are already mapped to Celtra macros described here.